This website may contain affiliate links, which means I may receive a commission if you click on a link and make a purchase. While clicking on these links won't cost you any extra money, they will help me keep this site up and running. Your support is appreciated!

Hey there, tech troubleshooters! Ever had that heart-stopping moment when your laptop screen goes from bright and lively to a shattered mess? It’s like the universe decided to play a cruel joke on you, right? But fear not, because we’re about to embark on a journey to resurrect your precious screen from its digital grave. So grab your toolkit and summon your inner tech whiz, because we’re diving into the world of how to fix a broken laptop screen!
Assess the Severity of the Damage Before You Begin
When you find yourself face to face with a glitchy gadget, it’s like coming across a mysterious temple in a video game. Before you charge ahead with your trusty toolkit, pause for a moment to assess just how tough this level is going to be. Here’s how to do it in a snap:
Evaluate the Symptoms:
Just like a seasoned detective surveying a crime scene, take a good long look at your device. Is it emitting strange noises? Refusing to light up? Or maybe it’s just running slower than a tortoise through peanut butter. Jot down all the peculiar behaviors you notice to guide your troubleshooting efforts.
Consult the Oracle (aka the Internet):
In this digital age, boundless wisdom awaits at your fingertips. Seek out forums, tech support websites, or even YouTube tutorials related to the symptoms you’ve observed. Someone out there has likely encountered the same conundrum and cracked the code. They might even point you toward reputable companies like Geek Squad or iFixit for tools and parts. Or, if you subscribe to the glories of DIY, you might just find your next challenge invigorating. Remember, my friends, knowledge is power!
When you arm yourself with these insights, you’re primed to embark on your repair quest with confidence. And I know you can tackle it with the prowess of a space pioneer facing the final frontier.
Gather the Right Tools for a DIY Screen Repair

Hey there, DIY enthusiasts! So, you’ve found yourself in a bit of a pickle with your screen – we’ve all been there! But fear not, because with the right tools and a little bit of elbow grease, you can tackle this project like a pro. Here’s how to gather the right tools for a DIY screen repair, so you can get your device back in top shape in no time.
1. Gather Your Gear
- Precision Screwdriver Set: Think of this like a trusty sidekick on your repair journey. It’ll help you tackle those tiny screws with ease, so you can get to the heart of the issue.
- Replacement Screen: This one’s a no-brainer, but make sure you do your research and find a high-quality replacement screen from a reputable company like iFixit.
- Pry Tool: A gentle touch is key here, so opt for a reliable pry tool to help you delicately separate the old screen from its housing without doing any damage.
2. Choose Wisely
- Adhesive Strips: These little guys are the unsung heroes of screen repair, keeping your new screen secure and snug in its rightful place. Look for precision-cut adhesive strips to ensure a seamless finish.
- Heat Gun or Hair Dryer: Just like a warm hug on a cold day, a bit of heat can work wonders in loosening stubborn adhesive. You can find a reliable heat gun at your local hardware store or opt for a trusty hair dryer if you’re in a pinch. Just be gentle with the heat – we don’t want any melted components!
Picture yourself as a digital detective, embarking on a mission to unveil the secrets hidden within your device. With the right tools in hand, you’ll navigate through the intricate landscape of circuitry and delicate components like a skilled artisan, bringing new life to your once-troubled screen.
Remember, it’s not just a repair – it’s a testament to your tenacity and resourcefulness, a journey of discovery and triumph as you breathe fresh vitality into your beloved device. So gear up, gather your tools, and let’s continue into the world of DIY screen repair together!
Disconnect Your Laptop from Power to Ensure Safety

Now, here’s a crucial step that often gets overlooked when it comes to ensuring the safety of your dear laptop.
Disconnecting your laptop from the power source may seem like a simple task, but it’s one that can’t be taken lightly.
Just like how a skilled conductor unplugs the final chord of a symphony, you need to gracefully and carefully detach your laptop from its power supply. Think of it as giving your laptop the opportunity to take a breather, much like you would when you unplug after a long day’s work.
So, let’s dive into why this step is so essential.
First off, disconnecting your laptop from power helps protect it from power surges and potential electrical mishaps.
Imagine your laptop as a precious treasure chest, and the power socket as a cave teeming with potential dangers. By disconnecting, you’re shielding your treasure from any lurking hazards, ensuring it remains safe and secure.
Moreover, it’s also a way to ease the strain on your laptop’s battery, much like how we all need a break from the daily hustle and bustle.
By giving your laptop a power pause, you’re extending the lifespan of its battery.
It’s like granting your laptop the gift of longevity, enabling it to keep up with your digital adventures for the long run. So the next time you’re wrapping up a productive session, don’t forget to give your laptop the tender care it deserves by disconnecting it from the power, and watch it breathe a sigh of relief!
Carefully Remove the Screen Bezel to Access the Panel
Now, let’s navigate the intricate process of liberating the screen bezel from your beloved gadget to access the panel. It’s almost like delicate surgery, but without the scrubs or scalpels! So, let’s dive into this thrilling adventure of peeking behind the curtain, carefully and meticulously.
- Prepare Your Workspace: Before embarking on this journey, ensure that your workspace is tidy and clutter-free. It’s crucial to have a spacious area to maneuver without knocking over your tools or spilling coffee. Give your surroundings a once-over and double-check that you have all the necessary equipment at hand.
- Gently Pry Open the Bezel: Think of the screen bezel as a reluctant door on a mystical treasure chest. Slowly and gently coax it open, using a trusty plastic opening tool. Exercise patience—it’s a virtue in the world of gadgetry, and force is not your friend. Applying undue pressure can lead to unsightly scratches, and we wouldn’t want that, would we?
So, as you breathe in the wonder of technology, remember that every twist, pull, and prod brings you closer to demystifying the inner workings of your device. Embrace the fascinating dance of delicate mechanisms and marvel at the intricacies that keep your gadget running like a well-oiled machine. Continue reading for more geeky escapades, and feel free to share your own experiences in the comments below.
Identify and Secure the Correct Replacement Screen
Let’s now embark on the quest to identify and secure the correct replacement screen for your cherished gadget.
First, Size Matters: Ah, the dimensions of the screen – the very essence of its visual existence. Take a moment to measure the length and width of your current screen. Let those numbers dance in your mind as you embark on your journey to find the perfect match.
Companies like iFixit and eBay are treasure troves of screens in various sizes and shapes, waiting to become the new visual portal to your digital world. Embrace the dimensions, and let them lead you to the perfect fit.
Compatibility is Key: Imagine a grand masquerade ball where each guest must find the perfect mask to fit their unique visage. Similarly, your replacement screen must be compatible with your device’s make and model. Research with diligence, dear reader, and ensure that the screen you choose is fully compatible with your beloved gadget.
Companies such as Amazon and Best Buy offer a plethora of screens designed specifically for different device models. Go forth and seek the screen that will seamlessly integrate with your device, becoming one with its essence.
Handle the LCD with Care During the Removal Process
As we embark on the journey of dismantling and reviving our beloved machines, let’s dive into the delicate art of handling the LCD with the tenderness it deserves during the removal process. Just like nurturing a delicate bloom, handling the LCD with care requires finesse and patience, ensuring the preservation of its pristine condition for future use.
To commence this delicate dance, here are some tips for ensuring the LCD removal process is a smooth and successful endeavor:
- Unplug and power down: Before delving into the dismantling process, again it’s crucial to power down the device and remove any external power sources. This not only mitigates the risk of electrical mishaps but also ensures a safe working environment for both you and the device. Let’s treat the LCD refreshingly like a flustered bumblebee—just give it a moment to settle down and be at ease before handling it.
- Gentle detachment: As you detach the LCD from its housing, akin to unraveling a tangled ball of yarn, exercise a gentle and steady hand. Maneuver the LCD with grace, avoiding any abrupt or forceful movements that could potentially cause damage. It’s like guiding a ship through a serene, winding river—steady and deliberate, ensuring the LCD sails smoothly through the removal process.
Remember, handling the LCD with care not only preserves its integrity but also ensures a seamless reintegration into your beloved device. Now, let’s show that LCD some love and respect as we guide it through this intricate journey. Feel free to check out reputable tech companies like iFixit for detailed guides on LCD removal and other handy tech tips.
Connect the New Screen to Your Laptop’s Video Cable
So, you’ve got the new screen in your hands, and now it’s time to connect it to your trusty laptop. This step is like finding the perfect puzzle piece that completes a beautiful picture. Let’s dive in and make that seamless connection happen.
Here’s the play-by-play:
- First off, locate the video cable port on your laptop. It’s usually located on the back or side. Make sure to give it a good once-over to ensure it’s dust-free and in tip-top shape.
- Next, carefully plug the video cable from your new screen into the matching port on your laptop. Gently does it here, folks. A little finesse goes a long way in avoiding any unwanted wiggles or jiggles that could disrupt your connection.
Now, you might be thinking, “Woz, won’t it be a hassle to have these cables sneaking around and cluttering up my workspace?” Excellent point!
For a sleek and tidy setup, consider using a cable management solution. Companies like Velcro offer nifty options to keep those cables in check and give your workspace a clean, organized look.
Trust me, it’s a game-changer. Once you’ve got everything connected and looking sharp, step back and bask in the glory of your collaborative work of art – your laptop and the new screen, working in perfect harmony. Ah, the satisfaction of a job well done!
I hope this step gets you one step closer to your ultimate tech setup. Keep those ideas flowing, and remember, technology is the canvas on which we paint our dreams and aspirations.
Test the Display Before Reassembling the Bezel
So, you’ve dismantled the bezel, carefully navigating through the intricate web of wires and components. Now it’s the moment of truth: testing the display before putting everything back together. This step is crucial to ensure that all the hard work you’ve put in so far pays off splendidly. Let’s dive in and make sure everything’s as crisp and clear as a pristine 4K display! Here’s how to test the display like a pro:
1. Power Up: Before flipping the switch, make sure all the connections are snug and secure. We don’t want any loose ends causing a glitch in the matrix! Once everything seems shipshape, power up the display and soak in the glow of technology coming to life. It’s like witnessing the birth of a digital phoenix rising from its silicon ashes.
2. Pixel Perfection: Take a closer look at the display, and scan for any wonky pixels or uneven brightness. This is your chance to spot any display irregularities before sealing the deal with a reassembled bezel. Think of it as scrutinizing a painting for brushstroke imperfections – the beauty lies in the details, and we want your display to be a masterpiece!
Now, test the waters and revel in the radiant display that lights up your world. If you notice any hiccups, remember, troubleshooting is an integral part of the journey to tech nirvana! Happy testing!
Secure the Bezel and Finish Up the Installation
Hey there, fellow tech enthusiasts! Now that we’ve laid the foundation for our project, it’s time to lock in the finishing touches and ensure our creation is buttoned up tight. So, let’s dive in and get down to business!
- Gentle Precision: As we prepare to secure the bezel, precision is key. Take a moment to appreciate the intricacies of this process – it’s like the delicate dance of aligning the final pieces of a puzzle, each movement purposeful and calculated. Ensure that the bezel fits snugly into place, encapsulating and protecting the inner workings of our device.
- Finesse in Fastening: With the bezel in position, it’s time to fasten it securely. Consider utilizing the reliable products from companies like 3M or Gorilla Glue for a strong and durable hold. Treat this step like the final chord in a symphony – the crescendo of the installation, where every movement and action culminates in the culmination of our hard work.
Remember, the journey doesn’t end here. As we finalize the installation, we’re setting the stage for the grand debut of our creation. So, embrace this moment, channel your inner perfectionist, and revel in the satisfaction of a job well done. Here’s to our collective passion for innovation and the pursuit of technological marvels! Keep that creative spirit alive, and let’s propel our projects to new heights!
Recycle the Old Screen Responsibly After Replacement

So, you’ve just upgraded your laptop screen, and now you’re left wondering what to do with the old screen. Well, fear not! I’ve got some tips on how you can recycle that old relic responsibly and give it a new purpose.
1. Research Local Recycling Options: First things first, do a quick search to find out where you can responsibly recycle your old screen. Many electronic stores, such as Best Buy, offer recycling programs for old electronics. Also, your city or town might have specific drop-off locations or e-waste recycling events. Check out Earth911’s website to find locations near you.
2. Donate for Reuse: If your old screen is still in good working condition, consider donating it to a local charity or community organization. There are many people out there who could benefit from having access to technology but may not be able to afford brand new devices. You can check with schools, non-profits, or even local shelters to see if they could use the device.
It’s like giving your old screen a second chance at life, just like finding a new home for a beloved pet in need. Remember, recycling your old screen not only helps the environment but also gives others the opportunity to benefit from your previously loved gadget. So, get out there and make a difference!
So there you have it, folks! Fixing a broken laptop screen may seem daunting, but with the right tools as accessories and a little patience, you can channel your inner DIY superhero and bring that screen back to life. Remember, don’t be afraid to get your hands dirty – or in this case, covered in screen adhesive. You’ve got this! And who knows, you might just find a new appreciation for the inner workings of your trusty laptop. Happy fixing!
Questions and Answers for How to Fix a Broken Laptop Screen
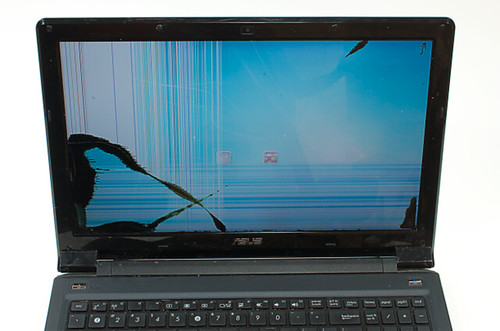
How do I know if my laptop screen is broken?
If your laptop screen is displaying flickering images, has visible cracks, or shows distorted colors, these are all common signs of a broken laptop screen.
Can I fix a broken laptop screen myself?
Yes, it is possible to fix a broken laptop screen yourself, but it requires some technical expertise and patience. If you’re not comfortable with this, it’s best to seek professional help.
What tools do I need to fix a broken laptop screen?
You’ll need a set of small screwdrivers, a prying tool, and possibly a replacement screen, depending on the extent of the damage.
How much does it cost to fix a broken laptop screen?
The cost of fixing a broken laptop screen can vary depending on the model and severity of the damage. It’s a good idea to get a quote from a professional repair service before deciding whether to fix it yourself.
Can I use an external monitor if my laptop screen is broken?
Yes, you can connect your laptop to an external monitor using a VGA, DVI, HDMI, or DisplayPort cable and use it as a temporary solution until you fix the broken screen.
How long does it take to replace a broken laptop screen?
If you’re experienced with laptop repairs, it can take around 30 to 60 minutes to replace a broken laptop screen. For beginners, it may take a bit longer.
Should I consider buying a new laptop instead of fixing the broken screen?
If the cost of fixing the broken laptop screen is close to or exceeds the cost of a new laptop, it might be more economical to invest in a new device.
Is it worth fixing an older laptop with a broken screen?
If the laptop is still functioning well and meets your needs, it’s often worth fixing the screen instead of investing in a new device, especially if the repair cost is reasonable.
Can a broken laptop screen affect other components?
In most cases, a broken laptop screen shouldn’t affect other components, unless there has been severe physical damage to the laptop itself.
How can I prevent my laptop screen from breaking in the future?
To prevent future screen damage, invest in a sturdy laptop case and handle your device with care, especially when transporting it. Applying a screen protector might also provide an extra layer of protection.